Thursday, January 29, 2015

DIY (More) Wall Art

Hey Blog world!
Its Thursday and you know what that means. Lazy Casey craft day! 
But honestly I still think these count because I did do them!

Today's post is a decoration my Mom decided she wanted when we were walking around Hobby Lobby. Like me she is on a tight budget so spending a lot of money on decorative things just doesn't make sense. Who do you think I got the mentality of "I can make that." from? So my crafty Mom got a new idea in her head and I got to help! 


You know whats really popular right now? Framed objects. Example (This is a picture off google. This is NOT the project we did)
So after seeing something similar my mom thought this would be a cool idea for her flea market wall...What doesnt every one have one of those? See let me back track My parents just bought a new house and there was a curious wall. It sort of looked like a big chalk board just randomly on the wall. I forgot to take a picture of the actual wall but when its fully complete I will share it with you. So not really able to do much with this wall from its randomness my mom decided to do something similar to the picture above just with stuff she already had. My parents are antique dealers and if its unique my mom loves it so they have collected some goodies over the years. So instead of just shoving it in a box or on a shelf she is in the process of making it wall art. 

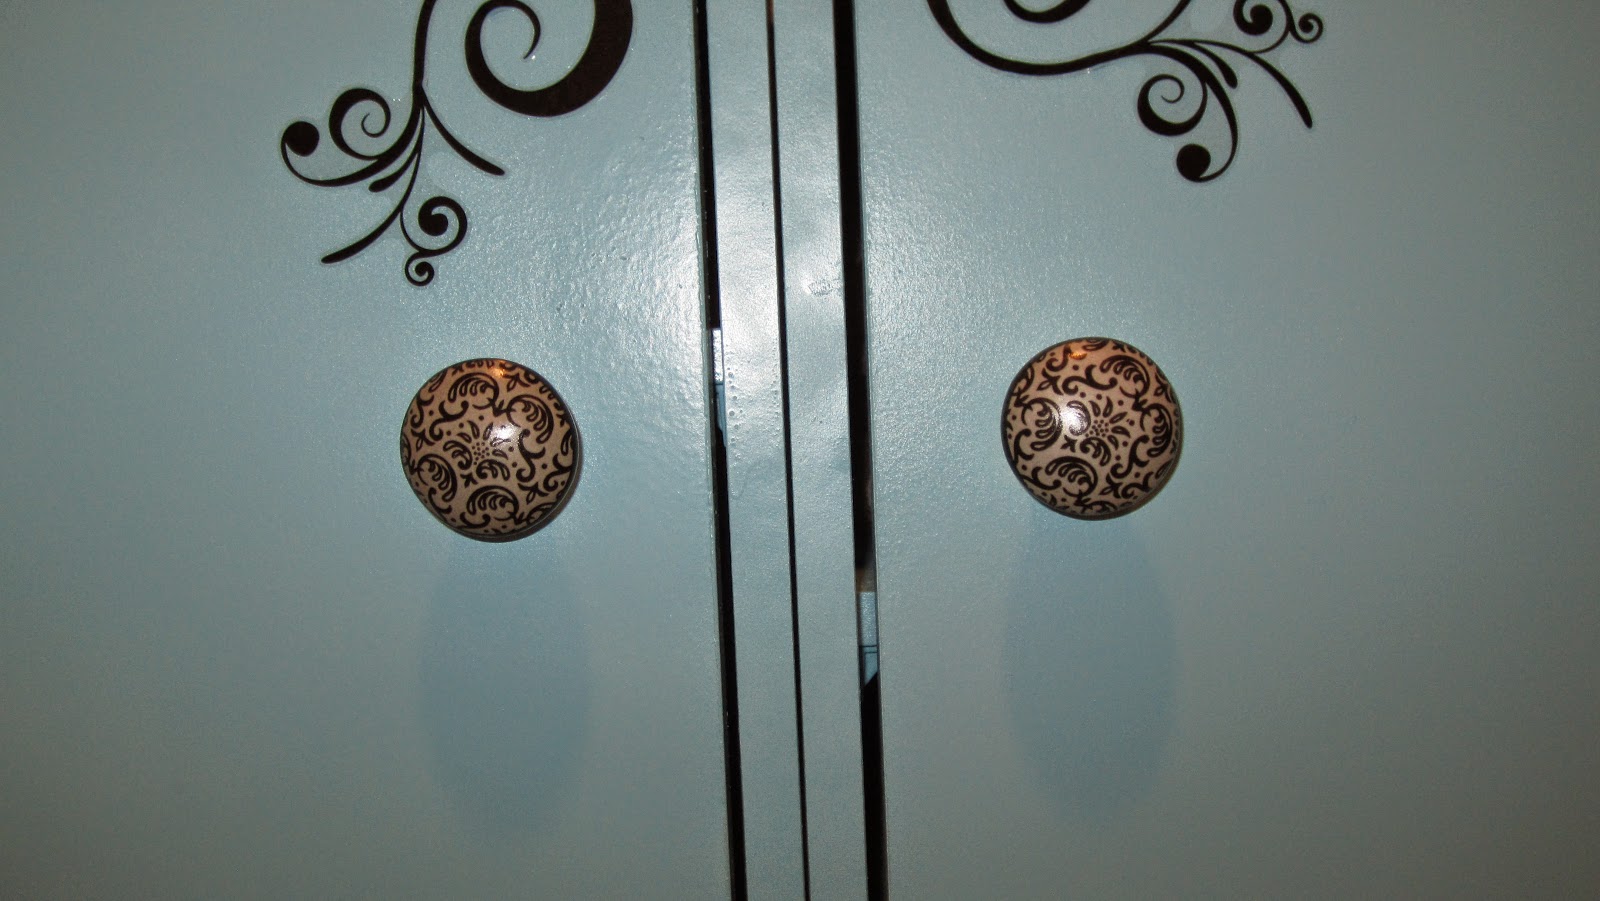
 With this said we were in Hobby Lobby and found similar frames to these but they wanted $30.00 a piece...Yikes. We decided to hold off on that part but My mom also noticed that door knobs and keys are in style now. And guess what she has a lot of? Did you guess door knobs and keys? I hope so if not try to keep up. Now the only problem was these door knobs were just, well door knobs. Usually you would put them in a door and maybe even attach it to a lock. Nope not us. We had different plans. So supplies needed for this project:
-Crackle paint
- 2 Different color craft paints
-Door knob
-Access to a drill
-Screws(?) Depending on project


My Dad also helped with this project. Men are so picky about who they let use their precious drills. 
Eh, who am I kidding I freak out when some one moves my stuff on my desk. So fair is fair. 

First start with a plain piece of wood. They have different shapes in Hobby Lobby we picked an oval shape and a rectangle shape. 
I painted Them first with the craft paint. THIS IS IMPORTANT! Read the instructions on the crackle paint. You will need to use both colors together to get a crackle effect. In case you were wondering what the crackle effect looks like just think of an antique painted piece of furniture that some people would sand down and re paint. Some people (Like my mom) have ways to make this by using the crackle paint and make it look old. See that's where me and my parents are different. They like there stuff to look old and antiqued. I guess I am more modern. 


So read the instructions for the crackle paint. In short the color you paint first is the color that is going to show through the "cracks" the color you paint over it is going to be the main color. For these two we did both. One a black board with gray cracks and the other a gray board with black cracks. 
Ok so once you figure out that nonsense you can start painting. Also on the crackle paint it tells you how long to leave the craft paint on! DO NOT LET THE CRACKLE PAINT COMPLETELY DRY.
So you are going to paint a good layer on the board let it set for a few minutes than put a thick coat of the crackle paint over top. Again this is the part where you don't let the crackle paint dry all the way. I believe I only waited a few minutes but its on the bottle...Which is not in my possession so I can not tell you off hand (I know this blog is very weak so far.) Then you will put the other craft paint on. Now you can let it completely dry. As it dries the more it will "Crackle". 
The next part is where you drill a hole in it. If you are smart and read all the directions first it doesn't matter but you can drill the hole first or whenever. Choice is yours. We did it after. 
My mom had my dad put the knobs in with...ok this part is hard because I am not sure on the name of the thingy but I just googled it and the closet thing I could find to it is called a hanger bolt.
The screw that has two ends with no head. 
this thing!
Ok phew I feel better now that I got that out. (I dont think you realize how much that was bothering me...I asked 3 people and they didn't know the name of this!)
Anyways so screw this in and than screw the knob at the top and tada!!!!
 Just add some picture hangers on the back and you can hang it on your wall. 

Ok I know that probably didn't make one bit of sense! and I truly apologize!
A lot happened tonight. We thought we had a leaky faucet so I called my Dad over to supervise the Boyfriend unit...just on the safe side. Well he came over they took apart the faucet couldn't tell what was wrong so they just put it back together and it healed itself. While they were doing that my mom and I headed to the lovely Kmart to get my comforter they had on sale. So I did a lot of running and a lot of type type type stop. Type type type. Stop. If this doesn't make sense I blame the busy Thursday and lack of info.
Any ideas? Send some in the comments or head on over to my Facebook page!

Overall this project was 

See ya Tuesday!


Tuesday, January 27, 2015

DIY Wall Mounted Jewelry Organizer

Whats up Bloggers?
So thanks to my fancy new Facebook page for my blog a friend sent me some ideas for your viewing pleasures! 

So this is my attempt at a 'Wall mounted organizer" 
Pretty simple, if you are a normal person...I think the most difficult of this whole thing was trying to take a picture of it with out hanging it. Tomorrow it will be going to a new home. So hanging it would not only be another pain to try to do, it would put unnecessary holes in my walls. So balancing it with one hand....Not the easiest but what I did. 

I hope my friend likes it. It was really simple! 

Supplies needed
-A shelf
-Hooks
-Spray paint

Some things I added to personalize it to be a 'Casey Original'
-A business card holder
-Scrap book paper
-Mod Podge

First step which seems to be my least favorite part but I keep finding myself doing it...Spray paint.
I used a different brand this time,Valspar Spray paint. I was impressed with the results. It went on smoothly and dried quickly...Ok just kidding I just really liked it because of the lockable top!
Purple! Oh yes that is my cat peaking into the shot. I really could have taken a new picture but I am sure that you will see more pictures of him anyways. This is Bruce. He is a very curious kitty. He was almost in every shot. 


After that I strategically placed some cup hooks around the shelf.

I also put some Mod Podge and scrap book paper on it to give it some spice.
Now some of you are probably wondering what the heck is that black thing on the front for. Well I am glad you asked!
I realized I didn't know what to use to hang earrings on so I got a wired business card holder and attached it to the shelf. It works good I think!
So there you have it! A wall mounted jewelry organizer. 

The only thing I would recommend about this project is if you are going to take a picture of it...HANG IT. 
This was a simple project and useful.

This project was :


Check out my Facebook page and get first look on whats going on during my blog week!

See ya Thursday!


Thursday, January 22, 2015

DIY "Stained" Glass Votive Holder #1

Hello Blog world!
So the other day I was asking a friend if I should do a fail project to mix it up. She told me to wait and let it happen naturally. Which I decided she was right. Well turns out it happened a little sooner than i thought. Now I can't say it was a complete fail...Just didn't turn out the way I thought it would. But I will try to redo this one at a later date. 


 Supplies that I used for this project. 
-Tissue paper
-Plain votive holder
-Mod Podge
-Candle
-Decorative hole puncher

The first thing I did was punch some holes in the tissue paper I used a star punch out which isn't what I wanted but it was what I had. 
So after punching out the tiny stars I Mod Podge the stars on the votive holder
My first complaint which should have been obvious to me that the Mod Podge didn't dry as clearly as I wanted it to, I should have maybe used it a little more sparingly. The original Pinner used a little brush. I used a sponge. So...that was my bad.
Next thing I didn't really take into consideration was the tiny tiny stars I had to work with. 
Tiny.
Tiny
Tiny...stars
I didn't really want to admit this, I really don't consider this project complete. The stars...They are so tiny!
So maybe not use a hole punch maybe more like a stencil cut out type thing. 
Of course with a good camera angle I was able to give you the illusion that it was complete. 
remember the Tiny..Tiny stars. 
I really like the idea of this project and I will master it!


See it has potential to be pretty. Just not this one...
The cost wasn't much so I don't feel to bad. This project cost me about 4 dollars to do. 
I like the fact that this can be made to suit any decorative needs. 
This can also be a great gift!


So I guess this project isn't exactly 'Casey Approved.' More like...

TO BE CONTINUED. 

Follow me on Facebook!
See what else I will be up to!
Send me suggestions. 


Tuesday, January 20, 2015

DIY Art

Happy Tuesday! 
After a 3 days off from work I was able to get some stuff done this weekend. Even took a trip to Michaels and got some supplies.
I got a good deal on some of the canvas that I used so that was a win!

So today's project was something I wanted to do for a while. I saw on Pinterest (Seriously are you surprised?) some one took a blank canvas and Mod Podge a scrap book page on it. How easy does that sound? Well I will tell you.

Supplies used
-Canvas
-Mod Podge
-Scrap Book paper


I actually found the scrap book pages at a yard sale. I think that was the most unexpected find yet. I got a few different pages but I only did one for now. I will post the others later on. 

This project was pretty simple (Are you sensing a pattern yet?) and cheap!
My boyfriends response was "Looks like you bought it like that" Which is music to my ears. When he doesn't get my projects than I know I did something horribly wrong. 

The only thing I would have done differently is maybe get a smaller canvas. Casey ditz: moment ended up getting the same size canvas as the scrap book page. 
So it doesn't over lap like it should. 

Not sure what happened with the Mod Podge but it sort of wrinkled towards the edges. 
But looking at it on the wall I think looks pretty good. 


I know my wall is very blah but I am working on it! Hence the picture!


Like I said I am planning on making a few more but for now just one. 
This was an easy project. These types of pictures are usually pretty pricey. So cheaper is always better in my book!
The canvas usually runs about $7.00-$9.00 Like I said I got the wrong size. This one is 12 X 12. Maybe the next size down. But Michaels had a 2 pack for $4.50. 
The scrap book page was .25 
Mod Podge well if you are a good crafter like me..You already have it. 
Ok so I just bought when I started the blogs. But it is lasting a long time and I used a lot of it so far. 

So now you have a pretty piece of wall art, even if you are art challenge like me...This is... how do I put this?


Now I have to go finish doing the not fun things of my Tuesday...Laundry. 
Seriously any body have any DIY projects that folds your laundry and puts it away? Please let me know! Ha-ha. 

See you Thursday!


Thursday, January 15, 2015

Dog food container

Happy blog Thursday! 
This is going to be a throw back Thursday type of blog. This is one of those projects I did in the past but it is worth sharing.

I was on the hunt one day for a food container for my animals and found that they were $20.00 for a small one $30.00 for a medium one (yes these are estimated but either way. Too much money!). So of course as I was browsing Pinterest I found that some one took a Tidy Cats litter container and made it into a storage container. Now that was reasonable to me since I have to buy cat litter anyways, why not recycle the container. So after you use up the litter clean out the inside.
The supplies needed for this project:
-Tidy Cats 35 Lb container (I would recommend it being empty first... just a suggestion.)
-Plastic friendly spray paint
-Some decorative duct tape
I recommend removing the handle first. It doesn't paint well...
Spray paint the outside (You can spray paint the inside if not using for food.)
Add your duct tape. 
You are done. 

Here you see the before and after picture:

The decorative duct tape I used wasn't on the roll they actually came in a sheet that I cut to fit the top. 
I left the inside yellow because I figured that was safer. Remember this is where I keep my animals food. 

Of course you don't have to limit yourself with just using these for food containers. 
This was a simple cost effective project. 
 You might run into some problems if you don't have a cat or a purpose for cat litter. 

If that's the case ask a friend that has a cat!
Total cost for me for this project was
Container 12.00 (But remember it comes with litter first...)
Spray paint- 5.47
Duct tape- 1.50 per sheet. 
Not really counting the container as a cost because like I said I just throw those out normally. The project can cost less then 10.00. Which is always a win, and its unique. We must always remember to be unique.

Sorry today's blog was kind of weak but I must admit I am a tad distracted by my new toy. I just purchased one of those LED nail lamps that you use for the gelish nail polish. I am trying it out tonight and so far I like the results. Maybe when I get a better opinion on how long the nail polish lasts I might do a DIY blog on painting your own nails and the benefits of not going to a salon! Let me know what you think in the comments! 
Remember to subscribe to my blog by entering your email at the top of the screen. It will ask you to verify the funny letters, Its ok it is just making sure your not a robot...For my robot friends sorry about your luck. 

So until next Tuesday..

Peace Love and Frugal-ness!


Tuesday, January 13, 2015

Stationary Set

Its Blog time!
How is every one doing today? Me as I am typing I have a feeling I am going to have to start using my washable keyboard again (yes they make those). My hands are covered in spray paint! Which leads me to this evenings post. Now you will notice in my first picture I used one business card holder but than changed it mid way through. What happened was that I live in Florida..what does that have to do with anything you ask? Well little fun fact for those who don't live in Florida...it gets very humid out. And for the last few days its been ridiculously humid and wet and gross and gloomy...Ok back on track. Well let me tell you trying to spray paint in said weather is a pain! So before I had a fit and threw the first business card holder out the door I figured I better do something else. So here is one of my finished products that I will be sharing with you today. 


See my Co-Worker asked me forever ago to make her a stationary set that fits her personality better. Right now she has a dog stationary set. Which I think is adorable...but for someone who doesn't really like animals...doesn't make a lot of sense. So she put me on a mission to make one for her. I had lots of ideas but like most of my ideas they work better in my head then actually trying to do them. I will show you the other piece which is the business card holder when I am done with it. Yeah leave it to me to wait until the last minute because as I type it is currently drying. So hopefully it will cooperate with me. 

This is what it looked like before. Plain old run of the mill black pencil cup and business card holder. 
Like I said the business card holder is not the one I ended up using. So I apologize for any false hope this may cause.

The items needed for this project:
-Business card holder/Pencil cup
-Plastic friendly spray paint. 
-Some fun stickers
-Craft sand
-Glue
-PATIENCE-

First thing I did was take all the plastic off, I don't know why I am including this step just want to make sure that it is clear..You do not paint the plastic wrapping. 

Spray painted the cup so it looked like this..

If you are plain and simple (nothing wrong with that) you can stop here and now you will have a (Insert color you like here) Pencil cup!
But I had more ideas so the next step I did was throw some glue on the bottom. I used Mod Podge but just glue will work.
Using a bowl that was bigger than the bottom I filled it up with some craft sand and dipped the pencil cup in. I went to Walmart first looking for the craft sand. They have it but its $4.47. I of course will always pick the cheaper option...No I didn't just use real sand (Although that thought crossed my mind) I found some at the Dollar Tree. You really have no idea what you can find there if you give it a chance! 
It actually took a few tries for me to get it to look this good. For some reason when I put the Mod Podge on it I didn't go all the way to the bottom of the cup. So I had a big ring of blue around the bottom that I tried to fix...Luckily this stuff washes off pretty well if you do it as soon as you make the mistake. After washing my pencil cup I redid being sure to go all the way to the bottom. 
Let it dry. 
This is important. 
Seriously let it dry. 
ok it's not that important...But I am sure it should be. 
After it dried partially I stuck some pretty stickers all over it. 


Looking at the pictures I see some things I would have done differently. Use more Mod Podge/Glue  because some areas are lacking some sand but overall I think it looks pretty cute!
Now I just took some pictures of the business card holder and I am not going to lie I am pretty impressed with how it turned out. Want to see? Tune in next time...

Oh I am just kidding, But seriously though come see me all the time! Remember Tuesdays and Thursday have become blog craft night! Are you excited? I know I am!

So here is the business card holder.
Makes ya want to go to the beach right? Well This business card holder is smaller than my original one. My boyfriend actually had this one laying around (What doesn't every body have these laying around?) And I actually rescued it from the trash..Seems like we need to have a discussion about what gets thrown away around here! So after washing it I spray painted this one and stuck the stickers on it as well. If you cant tell by the pictures the sticker over laps a little bit so I just put some plain scotch tape behind it so the business cards would stick to it. And I am also aware that the drinks may not be seen as well when the business cards are in it...But I still think it looks 'SO Cute!' 

So here ya go a personalized stationary set. Think about all the different stickers that are out there...The possibilities are endless! I want to see everybody with fancy stationary now! This didn't cost a lot to make. The break down (estimated) 
Pencil Cup- 1.47 (Walmart)
Business card holder(Walmart) # 1- 1.97
Business card holder #2- Free
Stickers found in scrap book section (Walmart)-2.00 
Spray paint (Plastic specific) (Walmart)-5.47
Sand(Dollar Tree)- 1.00 or free if you really want to use the outside stuff. 
If you don't have any of the supplies than this project cost about 10 dollars.

That's all for today see you Thursday!
Peace Love and Beaches!

P.S Having trouble commenting? Make sure the post as is selected to anonymous or sign into your Google account when it prompts you. If you see the funny letters that is just making sure you are not a robot. 


Thursday, January 8, 2015

Linen Closet

Hello Blog world! Wow this week went by fast feels like it was just the other day was Tuesday and I was talking to you...oh wait, it was! Since I decided to do this two times a week this blog might be a little week. I hope that you will still enjoy and know that once I get a schedule down better I will make sure that I am better prepared for the week. This project is one I did a while ago. My Boyfriend and I bought our first house in September. It is such a cute perfect little house and I love it to pieces. Only problem was it doesn't have a lot of storage spaces so I have had to get creative. I will show you eventually all the little things I have had to do but for tonight's post i will show you my "Linen closet". 
Isn't it cute! 
This project was also a very easy one for me. It was just a matter of finding something I could that use. Well again thanks to my Mom. She was going to leave this ugly white cabinet thing behind I thought I would rescue it. This is what it looked like before...
Pretty boring I know. All it took was some spray paint, scrapbook stickers and pretty knobs and I made it better.


The knobs were found at Hobby Lobby...a crafters dream store for those of you who don't know. I can spend hours in that store! They have a whole row of just different kinds of knobs! So I got these and my original idea was to use some sort of wall decal but I couldn't find any that would work for the idea in my head. So going through the scrapbook stickers I found these swirly things and thought they were perfect! and they matched my knobs, win win!

I wouldn't recommend using the stickers if it is something that you are going to touch a lot but for this purpose they will be OK I think. So far they haven't fallen off or anything and I don't see why they would. 
The spray paint however I didn't cheap out on this time. I Didn't save the can because like I said it was a while ago when I did this project. I used a paint and primer spray that was specifically used for plastic. Krylon Fusion is one I recommend for plastic. For this I used two cans but could have used a third for touch ups. 
Using this paint also didn't require any sanding. Of course this was a smooth surface I don't think it would have required sanding anyways. But when a project has less steps in it that makes it a lot easier!
See simple projects can go a long way with a little imagination! Spray paint helps also...Oh and Hobby Lobby!
I will get to go to the magic craft place soon and stock up. I have lots of ideas to share with you! But until next time I hope you enjoyed today's blog. I know it wasn't much but I will make up for it on Tuesday!
Help this blog grow! Share with your friends! Share your ideas! Lets all have a share-a-thon! 
By the way...This project is....


Peace, Love and Hobby Lobby makes me happy!


Tuesday, January 6, 2015

D.I.Y Chandelier

Hello Blog World!
        I know its only Tuesday but I missed you all terribly! So I thought what the heck, why wait until Thursday? So here I am. The project I did for this post was pretty simple...Well it would have been a lot more simple if I had all my supplies when I started...

 I was going through Pinterest and I saw a beaded chandelier made from a wire plant basket. I decided I wanted to try it myself but with a different idea in mind. I will post a picture of one of the more common ones that I saw.

Make your own chandelier for only a few bucks using this tutorial.  This dollar chandelier looks like a designer knockoff, but it's really a thrifty #DIY project.
I like it, its pretty. But its not my style. So I kept looking through getting some ideas for mine. I didn't find one that I wanted to duplicate so I did what I always do and said "Lets wing it!"


So Here are the supplies I started with. 

Wire basket
Ivy
Lights
Spray paint
Some wire cutters 
Wire
Beads 
Clear ornaments. 

    When I started I had a feeling that the ivy that I received (Thanks mom!) wasn't going to be enough.  But because I am impatient I started my project anyways. I am sure you can get the Ivy at any craft store. If I can save a few extra bucks I will always do that first! I found some garland at Dollar tree but it was a little bigger than the one I started with. They also had just the leaves so I bought them instead. Also I used the cheapest spray paint I could find, I don't recommend this for all your spray painting projects but for this one it will be just fine. Bonus the lights were on clearance because they were Christmas lights (score!). But these are all items you can find at thrift stores. That's my kind of project! So with all my supplies I spent about 8.00. That's being thrifty. 

      First I spray painted the basket. Then wrapped the ivy around first. When I ran out of the garland kind I just used the leaves. The wire can be used to wrap around the wire basket. Wrap the lights in any empty spaces so you don't over-lap the ivy. I hung my clear ornaments and beaded wire than Ba-Da-A-Boom you have a chandelier! 

At first I was going to dress up the ornaments but I like that the kind of look like bubbles.


The only thing I would have done differently would be where I started the lights. I tried lining them up with the chains to try to hide them but it kind of looks like to much at the top. As soon as I find another wire basket I will make another one of these. I will try to do more detailed pictures of the process. If you really love doing projects you will understand how hard it is sometimes to stop in the middle to take a picture! That and I never know what I am going to do until I am done. To be honest with you I had no idea what exactly I was going to do for this until I finished. That's the fun of making something yourself. Its yours. Not something you can find at the stores. So take this post as a guideline to making your own unique chandelier. 
Remember to have fun with it!
If you have any questions don't hesitate to ask! 
If you want to see future posts put your email in the subscription box at the top of the page.


I give this project the 'Casey Approved' stamp!


See you Thursday!
Peace, love and Get all your supplies at once!